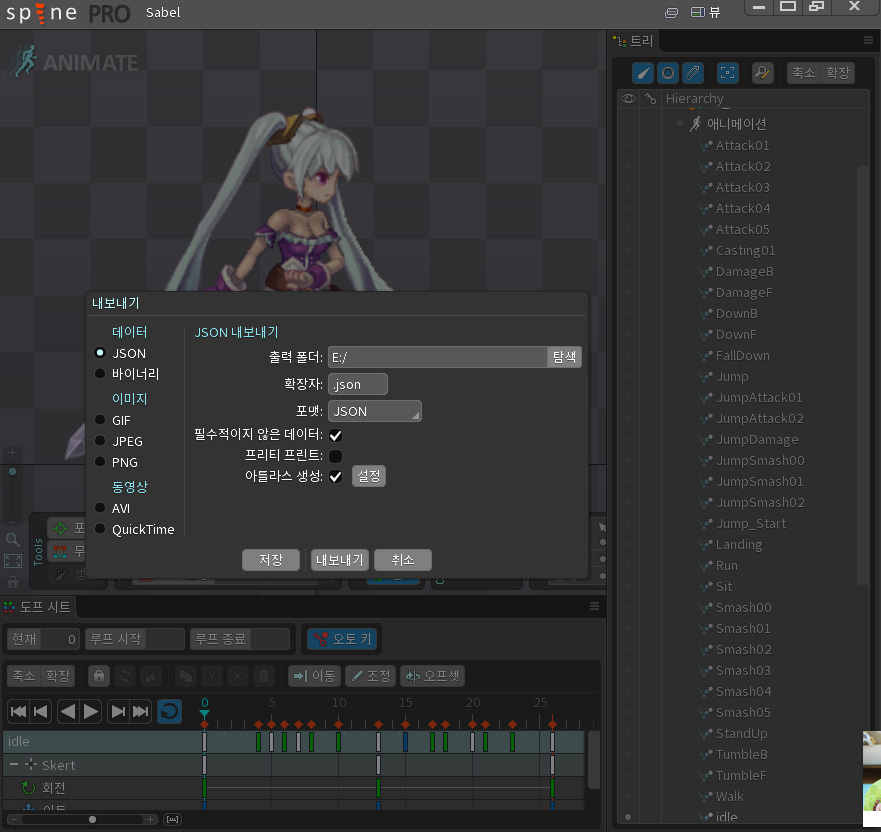
(출처 : http://ko.esotericsoftware.com/spine-unity#Controlling-Animation)
Controlling Animation
애니메이션 제어하기
SkeletonAnimation
Normally, Spine.AnimationState manages keeping track of time, updating the skeleton, queueing, layering and mixing/crossfading animation. If you're used to "Mecanim" as having State Machines, Spine.AnimationState is a simpler, non-programmable kind, but flexible enough to serve as the base for most animation logic.
일반적으로 Spine.AnimationState 는 타임트랙 유지, 스켈레톤 갱신, 큐, 레이어링, 애니메이션의 믹싱/크로스페이딩을 관리하게 된다. 만약 당신이 상태 관리를 위해서 "메카님"을 사용하는 데에 익숙하다면, Spine.AnimationState 가 더 간단하고 프로그램을 잘 모르는 사람도 사용하기 쉬우면서도 대부분의 애니메이션 로직에 대응하기에 충분한 유연성을 제공할 수 있다.
But Spine.AnimationState is a C# class. To make it usable in Unity, the Spine.AnimationState object is wrapped in a MonoBehaviour called SkeletonAnimation. You will find that SkeletonAnimation has a member field called state, a reference to the Spine.AnimationState object.
하지만 Spine.AnimationState 는 C# 클래스이므로, 유니티에서 사용하려면 Spine.AnimationState 를 MonoBehaviour에서 SkeletonAnimation 이라는 이름으로 사용해야 한다.
SkeletonAnimation both manages the timing of the updates (through Update) and generates the Mesh object since it derives from the SkeletonRenderer class. This is the main component that's added to the GameObject when you Instantiate a Skeleton Data Asset into a "Spine GameObject". You could say that SkeletonAnimation is the Spine component.
SkeletonAnimation 은 SkeletonRenderer 클래스에서 받아와 메쉬 오브젝트를 생성하고 Update를 통해 타이밍을 관리한다. 이것은 유니티에서 Spine GameObject를 사용해 Skeleton Data Asset 을 생성했을 때 자동으로 만들어진다. SkeletonAnimation 은 곧 스파인 컴포넌트라고 생각해도 좋다.
How to use SkeletonAnimation
SkeletonAnimation 사용하기
For Beginners
당신이 초심자라면
“Out of the box”, an instantiated GameObject with a SkeletonAnimation component on it is ready to go. Changing the Animation dropdown in the Inspector allows you to set the initial animation for that SkeletonAnimation object which starts playing immediately when the scene starts.
SkeletonAnimation 컴포넌트로 만들어진 GameObject만 있으면 준비는 된 것이다. 인스펙터에서 애니메이션을 변경하면 SkeletonAnimation 에 초기 애니메이션을 설정해줄 수 있다. 프로그램이 실행되고 씬이 동작하면 즉시 이 애니메이션이 돌아가게 된다.
Looping can be enabled and disabled, and the Time Scale can be changed. These Inspector properties map to .AnimationName, .loop and .timeScale.
계속 반복되는가의 여부와 타임스케일(빠르기)도 설정해줄 수 있다. 이것은 코드에서 .AnimationName / .loop / .timeScale 을 통해 읽어들여 사용할 수 있다.
For beginner code, you can use skeletonAnimation.AnimationName property to change the playing animation with its name. It will start playing and loop if the skeletonAnimation.loop was set to true at the time it was changed.
초심자 코드라면, skeletonAnimation.AnimationName 프로퍼티를 사용해 재생될 애니메이션을 변경할 수 있다. 재생이 시작되고 skeletonAnimation.loop가 true로 설정되면 계속 반복 재생될 것이다.
skeletonAnimation.timeScale = 1.5f;
skeletonAnimation.loop = true;
skeletonAnimation.AnimationName = "run";
Left and Right Animations
좌우 이동 애니메이션
It is not necessary for you to animate left-facing and right-facing animations in Spine editor. SkeletonAnimation's Skeleton object has a FlipX property (and FlipY) you can set which horizontally flips the rendering and logical positions of bones of that skeleton.
당신이 스파인 애니메이터에서 좌우 각각의 애니메이션을 따로 만들어야 할 필요는 없다. SkeletonAnimation 의 Skeleton 오브젝트는 FlipX와 FlipY 프로퍼티를 가지고 있어서 본의 위치와 렌더링 포지션을 뒤집어 출력시킬 수 있다.
// If your character was facing right, this will cause it to face left.
// 만약 캐릭터가 오른쪽을 보고 있다면, 이 코드는 왼쪽을 보게 만들어준다.
skeletonAnimation.skeleton.FlipX = true;
However, if you opted to design your character asymmetrically but the movement is essentially the same in both directions, you can use Spine's Skins feature to have two skins— one facing right, and one facing left— and switch between those two as your character faces left and right.
하지만, 당신이 캐릭터의 좌우 그래픽을 다른 형태로 디자인했다면, 스파인의 스킨 기능을 써서 좌우 두가지 모습을 만들고 캐릭터가 좌/우로 움직일 때 각각 다른 스킨을 바꿔가며 보이게 할 수 있다.
bool facingLeft = (facing != "right");
skeletonAnimation.skeleton.FlipX = facingLeft;
skeletonAnimation.skeleton.SetSkin(facingLeft ? "leftSkin" : "rightSkin");
For Typical Use
전형적인 사용법
The class that actually controls the animation of the skeleton is Spine.AnimationState. SkeletonAnimation is built around AnimationState. It stores a reference to its instance of Spine.AnimationState in SkeletonAnimation.state. This is instantiated on Awake so make sure to only access it on Start or any time after.
스켈레톤의 애니메이션을 실질적으로 컨트롤하는 클래스는 Spine.AnimationState 이다. SkeletonAnimation 은 AnimationState를 포괄하도록 만들어졌으며, SkeletonAnimation.state 안에 Spine.AnimationState의 인스턴스를 참조하여 저장한다. 이것은 Awake를 사용해서 생성할 수 있고 Start로 시작시에 부르거나 이후 언제든지 불러올 수 있다.
AnimationState is Spine’s common-case implementation of a Spine Animation State Machine. It is lower-level in a sense that it only manages updating, queuing, layering and mixing/crossfading animations. (It is not a "State Machine" in the Mecanim sense).
AnimationState 는 스파인의 일반적인 삽입 방식이다. 메카님을 작업할 때의 "스테이트 머신"이 아니다. 좀 더 로우레벨이고 업데이트, 큐잉, 레이어링, 믹싱, 크로스페이딩만을 관리한다.
In code, you can play animations through AnimationState methods:
코드에서는 AnimationState 메소드로 애니메이션을 플레이할 수 있다.
// Plays the animation named “stand” once on Track 0.
// 애니메이션 "stand"를 트랙 0에 할당하고 한번만 재생한다.
skeletonAnimation.state.SetAnimation(0, “stand”, false);
// Queues the animation named “run” to loop on Track 0 after the last animation is done.
// 애니메이션 "run"을 마지막 애니메이션 뒤에 트랙 0으로 반복 재생하도록 큐잉한다.
skeletonAnimation.state.AddAnimation(0, “run”, true, 0f);
Mixing/crossfading options can be found on your SkeletonDataAsset's inspector. There you'll find a field for "Default Mix" which is the default duration of a mix between two animations on the same track. You may also define specific mix durations for specific pairs of animations there.
믹싱/크로스페이딩 옵션은 SkeletonDataAsset 의 인스펙터에 있다. Default Mix 라는 필드가 있는데 이것은 하나의 트랙을 사용하는 두 개의 애니메이션 간의 믹스 수치를 결정하는 것이다. 특정 애니메이션 간에 임의의 믹스 타이밍을 주고 싶다면 이 수치를 조절해야 할 수 있다.
TRACKS
트랙
Tracks are animation layers, for playing more than one Spine animation at once.
트랙이란 동시에 재생되는 1개 이상의 스파인 애니메이션을 위한 레이어와 같은 개념이다.
This is useful for when, for example, you have an animation for a character's body running, but also have an animation for the arm shooting a gun.
이것은 예를 들면 하나의 캐릭터가 다리는 달리고 팔은 총을 쏘는 두 개의 애니메이션을 가지고 있을 때에 유용하다.
If you play an animation on track 0, and another animation on track 1, both animations will play at the same time and end or loop according to their own durations independently.
만약 한 애니메이션을 트랙 0에서 재생하고 다른 애니메이션을 트랙 1에서 재생한다면, 각각의 애니메이션은 함께 재생되면서 각각 애니에 설정된 대로 끝나거나 반복된다.
The animations keys of the animation playing on the higher track will override the keys of the lower track: higher track number, higher priority.
두 애니메이션이 같은 부분의 키를 가지고 있을 경우, 더 높은 트랙의 키가 낮은 트랙의 키를 덮어버린다. 즉 높은 트랙이 높은 우선권을 가진다.
// Play a running animation on track 0, and a shooting animation on track 1.
// 트랙 0에서 달리는 애니, 트랙 1에서 총을 쏘는 애니메이션을 재생
skeletonAnimation.state.SetAnimation(0, "run", true);
skeletonAnimation.state.SetAnimation(1, "shoot", false);
TRACKENTRY
트랙 엔트리
When you call SetAnimation or AddAnimation, it returns a TrackEntry object.
SetAnimation이나 AddAnimation을 호출했을 경우, TrackEntry 오브젝트가 리턴된다.
This object represents the instance of an animation playback for the animation you just played or queued. It holds information about what animation it is, its elapsed time, its own timescale and several other properties.
이 오브젝트는 방금 플레이했거나 큐된 애니메이션의 인스턴스를 되돌려준다. 여기에는 어떤 애니메이션인가, 걸린 시간은 얼마인가, 타임스케일 크기, 그리고 몇 가지 다른 프로퍼티가 들어있다.
TrackEntry lets you control the state of a playing or queued animation, and playback parameters not included in SetAnimation and AddAnimation.
TrackEntry는 재생중이거나 큐된 애니메이션의 상태를 컨트롤할 수 있게 해주고, SetAnimation과 AddAnimation에 포함되지 않은 파라미터를 플레이백한다.
If you choose not to keep the reference to the TrackEntry object when you called SetAnimation or AddAnimation, you can get the currently active TrackEntry by calling
당신이 SetAnimation이나 AddAnimation을 호출했을 때 TrackEntry 오브젝트에의 참조를 보관하지 않기로 했다면, 다음을 호출해서 현재 활성화된 TrackEntry를 얻어올 수 있다.
var trackEntry = skeletonAnimation.state.GetCurrent(myTrackNumber);
// null if no animation is playing.
// 만약 아무 애니도 재생되지 않고 있다면 null이 리턴된다.
CURRENT TIME (OR START TIME)
현재 시간(혹은 시작 시간)
The time the Animation is currently playing at can be changed at any point while it's playing.
현재 재생중인 애니메이션의 시간은 재생되고 있는 중에 언제든지 바뀔 수 있다.
For example, you can change the .Time immediately after SetAnimation so the animation starts in the middle instead of the beginning. Note that time is in seconds. To convert Spine editor frames to seconds, you must divide by the dopesheet’s 30 fps tick marks: time = (frameNumber/30f).
예를 들어, SetAnimation 이후 .Time을 즉시 바꿀 수 있고 그러면 시작지점 대신에 중간에서 애니메이션을 스타트시킬 수 있다. 이 시간이 초 단위라는 것을 기억하자. 스파인 에디터의 프레임을 초로 환산하려면, 타임 도프시트의 수치를 30으로 나눠야 한다.
// Play a "dance" animation starting from frame 10
// "dance" 애니메이션을 10프레임부터 재생
var trackEntry = skeletonAnimation.state.SetAnimation(0, "dance", false);
trackEntry.Time = 10f/30f;
// You can shorten the above code this way if you only need
// to change one field, and don't need to store the trackEntry.
// 만약 필드 하나만 바꿀 것이고 트랙 엔트리를 보존할 필요가 없다면 코드를 아래와 같이 더 줄일 수 있다.
skeletonAnimation.state.SetAnimation(0, "dance", false).Time = 10f/30f;
If you are doing this to Animations with animation events, make sure you also set lastTime to the same value as well. If lastTime is left as 0, all events between time 0 and time will be captured and raised/fired in the next Update.
만약 이것을 애니메이션 이벤트와 함께 하려면, lastTime을 같은 값으로 해 줘야 한다. 만약 lastTime이 0이 되어버리면, 0에서부터 time까지 사이에 있는 모든 이벤트가 캡처되고 다음 Update 때 나와버릴 것이다.
You can also change the point where the animation ends by setting .EndTime.
.EndTime을 설정해서 애니메이션이 언제 끝날 것인지도 정해줄 수 있다.
TIMESCALE
타임스케일
You can change the playback speed by setting that TrackEntry’s .TimeScale. This gets multiplied by the SkeletonAnimation.timeScale and AnimationState.timeScale to get the final timescale.
트랙엔트리의 .TimeScale을 설정해서 애니메이션의 재생 속도를 바꿀 수 있다.
You can set timeScale to 0 so it pauses. Note that even if timeScale = 0 results in the skeleton not moving, the animation is still be applied to the skeleton every frame. Any changes you make to the skeleton will still be overridden in the normal updates. Here is a sample helper method if you want to jump to a certain point in time.
timeScale 을 0으로 설정해서 애니메이션을 일시 정지시킬 수 있다. timeScale을 0으로 하는 순간 스켈레톤은 움직이지 않지만, 매 프레임 애니메이션은 계속 적용되고 있다는 점을 기억하자. 스켈레톤에 가해지는 변형은 계속 업데이트되고 있을 것이다.
static public Spine.TrackEntry JumpToTime (SkeletonAnimation skeletonAnimation, int trackNumber, float time, bool skipEvents, bool stop) {
if (skeletonAnimation == null) return null;
return JumpToTime(skeletonAnimation.state.GetCurrent(trackNumber), time, skipEvents, stop);
}
static public Spine.TrackEntry JumpToTime (Spine.TrackEntry trackEntry, float time, bool skipEvents, bool stop) {
if (trackEntry != null) {
trackEntry.time = time;
if (skipEvents)
trackEntry.lastTime = time; // in pre-3.0. This ignores attachment keys too.
// 3.0 이전 버전에서는 이 부분이 어태치먼트 키도 무시하게 된다.
if (stop)
trackEntry.timeScale = 0;
}
return trackEntry;
}
TRACKENTRY-SPECIFIC EVENTS.
트랙 엔트리 - 특정 이벤트
You can subscribe to events just for that specific animation playback instance. See the list of events here: Events Documentation.
특정한 애니메이션 재생을 위해서 이벤트를 사용할 수 있다. Events Documentation 에서 어떤 이벤트들이 있는지 확인해보자.
Spine.Animation
A Spine.Animation object corresponds to an individual "animation clip" animated in Spine. If a run animation called "run" was animated in Spine, you'll get a Spine.Animation object named "run".
Spine.Animation 오브젝트는 스파인에서 재생되는 개별 "애니메이션 클립"에 대응한다. "run"이라는 애니가 스파인에서 재생되었다면, "run"이라는 이름의 Spine.Animation 오브젝트를 얻을 수 있다.
Each Spine.Animation is a collection of Timeline objects. Each Timeline object is a collection of keys, which defines how a certain animatable value (scale, rotation, position, color, attachment, mesh vertices, IK, events, draw order) changes over time. Each Timeline has its own target: a Bone for scale, rotation and position; a slot for attachments and colors; a MeshAttachment for mesh deformation, and the appropriate parts of the skeleton for draw order and events.
각각의 Spine.Animation 은 타임라인 오브젝트의 집합이다. 각각의 타임라인 오브젝트는 매 시간 변화하는 애니메이션 값들(스케일, 회전, 위치, 컬러, 어태치먼트, 메쉬 버텍스, IK, 이벤트, 드로우오더)를 정의하는 키 값들의 집합이다. 각각의 타임라인은 대상 타겟을 가지고 있다. 스케일과 회전, 위치는 Bone, 컬러는 Slot, 메쉬 변형치와 드로우 오더, 이벤트는 MeshAttachment이다.
In Spine runtimes, a Spine.Animation is applied to a skeleton with Animation.Apply(...). This poses the Skeleton's various parts only according to that Animation's Timelines and keys. If a Timeline isn't there, the animatable value won't change. If a Timeline is there, it will overwrite whatever value is there with a new value.
스파인 런타임에서 Spine.Animation은 Animation.Apply(...) 와 함께 스켈레톤에 적용된다. 이것은 스켈레톤의 여러 가지 파츠들을 애니메이션의 타임라인과 키에 따라 움직여서 애니메이션을 만들어 낸다.
This means that if you play two Animations at the same time using Spine.AnimationState's track system, the Timelines of the higher track will overwrite any changes that the lower track applied, but will not modify anything else.
이는 Spine.AnimationState의 트랙 시스템을 사용해 2개의 애니메이션을 함께 재생할 때, 높은 트랙의 타임라인이 낮은 트랙에 덮어씌워진다는 것을 의미한다.
This system allows the user to combine different animations for different parts of the skeleton and play them back independently of each other.
이것은 스켈레톤의 각각 다른 파츠를 움직이는 별개의 애니메이션을 유저가 조합할 수 있도록 해 준다.
Posing the Skeleton according to an animation frame/time.
애니메이션 프레임 / 시간에 의해 스켈레톤 움직이기
You can call Animation.Apply directly if you want to pose a skeleton according to a certain point in time in that Animation. The Spine-Unity runtime also has a Skeleton.PoseWithAnimation extension method that allows you to do this according to an animation's name.
애니메이션의 특정 지점의 스켈레톤 포즈를 바로 취하는 데에 Animation.Apply 를 호출할 수 있다. 스파인-유니티 런타임도 Skeleton.PoseWithAnimation 확장 메소드를 가지고 있어서 애니메이션 이름을 이용해 원하는 포즈를 찾을 수 있다.
One of the parameters is always time. This is time in seconds. If you want to pose the skeleton according to what you see in the editor, you may need to call skeleton.SetToSetupPose() before calling Animation.Apply or Skeleton.PoseWithAnimation
파라미터 중의 하나는 항상 초 단위의 시간 값을 가진다. 에디터에서 보이는 대로 스켈레톤을 움직이고 싶다면, Animation.Apply 나 Skeleton.PoseWithAnimation을 호출하기 전에 skeleton.SetToSetupPose 를 호출해야 한다.
One Animation After Another (pre-3.0)
하나의 애니메이션 직후에 다른 애니메이션 재생 (3.0 이전 버전)
This also means that without auto-reset logic, playing animations one after another will not necessarily cause it to look like what the animations like in Spine editor. Instead, playing a sequence of animations will result in later animations inheriting the values and bone poses of the previous animation.
이것은 자동 리셋 로직 없이, 하나의 애니메이션이 끝난 직후 다른 애니메이션을 재생할 때 스파인 에디터에서 보이는 것처럼 바로 리셋이 되도록 하는 것을 말한다. 이것이 없으면 이전 애니메이션의 키 값이 남아서 다음 애니메이션에 영향을 끼쳐 버리기 때문이다.
In 3.0, Spine.AnimationState will handle auto-reset logic itself and give you the option to use it so it can behave like it does in Spine editor, or if you want the original free-rein mode for advanced uses.
3.0에서는, Spine.AnimationState 가 오토 리셋 로직을 자체적으로 관리하고 스파인 에디터에서처럼 자동으로 초기화될지, 아니면 보다 고급 사용을 위해 이전 애니메이션 키값을 남길지 선택할 수 있게 해준다.
Animation Callbacks + Spine Events
애니메이션 콜백 + 스파인 이벤트
Spine.AnimationState provides animation callbacks in the form of C# events. You can use these to handle some basic points of animation playback.
Spine.AnimationState 는 C#의 이벤트 형식으로 애니메이션 콜백을 제공한다. 이것을 이용해 애니메이션 재생의 기본적인 포인트를 제어할 수 있다.
Spine.AnimationState raises events:
Spine.AnimationState 가 발생시키는 이벤트는 다음과 같다:
Start when an animation starts playing,
Start : 애니메이션이 언제 재생을 시작하는가
End when an animation is cleared or interrupted,
End : 애니메이션이 언제 중단 혹은 취소되는가
Complete when an animation completes its full duration,
Complete : 애니메이션이 언제 완료되는가
Event when a user-defined event is detected.
Event : 사용자가 정의한 이벤트가 감지되었을 때
WARNING:
주의 :
NEVER subscribe to End with a method that calls SetAnimation. Since End is raised when an animation is interrupted, and SetAnimation interrupts any existing animation, this will cause an infinite recursion of End->Handle>SetAnimation->End->Handle->SetAnimation, causing Unity to freeze until a stack overflow happens.
To learn more about Spine Events and AnimationState callbacks, see the Events documentation.
End 이벤트는 SetAnimation을 호출하는 메소드로 사용하지 말 것. 애니메이션이 중단됐을 때 End가 걸리고, SetAnimation 이 모든 존재하는 애니메이션을 멈춰 버리며, End->Handle>SetAnimation->End->Handle->SetAnimation 식의 무한 루프가 걸리게 된다. 이렇게 되면 유니티 자체가 뻗어서 스택 오버플로우 에러가 날 때까지 멈춰버리게 된다.
Advanced Animation Control
고급 애니메이션 컨트롤
Tracks and TrackEntry are just part of Spine.AnimationState, and AnimationState is included with the Spine runtimes just to get you going immediately. It's usable in most cases and performant for production. However, Spine-Unity and Spine-C# can function even without AnimationState. For example, SkeletonAnimator uses UnityEngine.Animator instead of Spine.AnimationState and uses Mecanim to manage numbers and data for mixing, layering and queueing.
트랙과 트랙엔트리는 Spine.AnimationState 의 일부일 뿐이며, AnimationState 는 바로 사용할 수 있도록 스파인 런타임 안에 포함되어 있다. 이것은 대부분의 경우에 유용하지만, 스파인-유니티와 스파인-C#은 AnimationState 없이도 애니메이션을 제어할 수 있다. 예를 들어, SkeletonAnimator는 Spine.AnimationState 대신에 UnityEngine.Animator 를 사용하고 데이터의 믹싱, 레이어링, 큐잉과 애니메이션 번호 관리를 위해서 메카님을 사용한다.
If you wanted to do bookkeeping of your animations a different way, whether to be optimized based on how you plan to use it, or to handle special cases just the way you want them, you can build a different system.
만약 애니메이션을 다른 방식으로 다루고 싶다면 다른 방식으로 시스템을 만들어야 한다.
In this case, studying the Official Spine Documentation will come in handy.
이런 경우라면, 공식 스파인 문서를 좀 더 자세히 연구하는 것이 좋을 것이다.